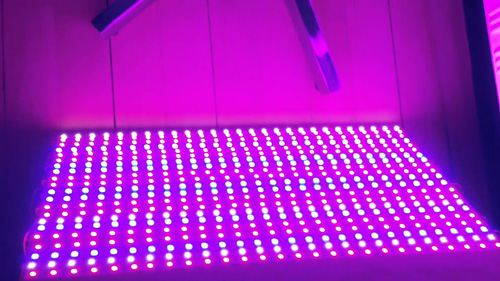
DIY LED Grow Light: How to Build?
LED Grow Lights are the future of Urban Farming because of its efficiency and effectiveness.
Indoor farming practice is becoming common as the world is progressing and LED Grow Lights are one of the vital equipment for doing this. The farming ensures that crops or plants can be grown in any season irrespective of the suitable season for a particular crop.
These lights are suitable for indoor farming because their lifespan is 50,000 hours on an average and also they are very good at reducing the cost of electricity, and very efficient.
Building DIY LED Grow Light

See Also: Best LED Fog Lights – Reviews & Guide
They are available at the market, but more often than not, cost much higher than a person can afford. This is why one can also go for the option of making LED Grow Lights at home which is easy and doesn't take a lot of effort and can be used widely while doing indoor farming.
Required Materials
Prerequisite Knowledge
Before building an LED Grow light, an individual has to be aware of the basic idea of wiring. Because if anybody is not at all aware of it, this task may become dangerous for them. If somebody has no idea about wiring, it may result in a blast. Thus, the necessary information should be gathered beforehand.
The type of light and the configuration one wants to use in farming should also be known before going out to buy lights.
Also, it may cost a person 100-150$ to build this thing, but the best idea will be to buy the items in bulk so that the average cost can come down a bit. While buying equipment, one should also opt for materials with a sturdy outset and strong built.
Drilling and Marking
The first step of building an LED grow light is drilling the panel for the LED drivers. Once all the equipment and materials are bought, one has to start with drilling the panel and has to create six holes in the panel for the cord.
The holes should be drilled according to the size of the bolts. These holes will ensure that the cord passes through them. A scale may be used in this case to find the middle point of the LED drivers.
After drilling is done, a marker should be used to mark the points of the LED drivers and one additional mark should be given on the position in which the cord will go through. The hole of the wire should be bigger than the hole for the LED drivers.
Then an individual will have to mark for the LEDs. The markers should be used in the places the LEDs will be used. For this, one may create 36 rectangular shapes in the panel which has 6 rows and 6 columns. One may use more or fewer LEDs according to their need.
Gluing
Gluing is an easy process, but it must also be done carefully. The LED lights should be attached to the panel with the silicone/thermal glue and while connecting the positive and negative side of the LED terminals should be kept on the same side.
The LEDs should be stuck in a way that air would not pass between the lights and the panel. After attaching the LED lights, a person may have to wait for several hours or even a night so that the lights can be attached to the panel perfectly.
Solder and Bolts
When the glue is hardened enough, the LEDs will need to be soldered. The LEDs may be soldered in any way according to the preference of an individual, but the rectangular shape is preferred.
Then the wiring must be done simply, and one can understand it if he/she is aware of the wiring of batteries. Soldering the plus side of the terminal to the minus side should be enough.
Wire stripper will then come into play as it will be needed to cut one side of the wire a little bit to get rid of a tiny portion at the end of the wire. Then the positive and negative side of each drive to each LED should be soldered to the terminal.
Next, place the bolts on the panel, and tighten them with the nuts, and after that, the LED drivers should be attached on the bolts, and the bolts should be tightened more leaving room between the drivers and bolts for heat dissipation.
At this stage, the power will be brought in by soldering the AC wires together for all the wires and then attaching them to one of the wires of the plug. Bolts may also be used here to secure the plugging, and a retractable cord may be used in this case too.
Cooling
The cooling fan may be used to reduce the temperature which in turn will increase the life expectancy of the LED lights. Also, you may add a thermal switch to the circuit in case the fan doesn't work.
The panel can get very hot, and for this reason, cooling is significant, and one will have to ensure that they use any cooling system that they prefer. Some lights get very hot and require constant cooling and others don't, so you will have to be careful of these facts.
Final Thoughts
With the right materials and equipment in hand, one will easily be able to make the LED grow light. These lights will be vital for the future of urban farming.
Necessary precautions along with a little idea about all the equipment and good knowledge about wiring will go a long way in ensuring that the LED lights are correctly built.
As the lights are expensive, it is recommended to make a panel at home and follow the steps mentioned above to have a light panel ready within 16-24 hours, and it will only cost 100-150$.

